Zwischensumme: 300,00 €
120,00 €
In stock
Category: Projects | Projekte
Tags: a heater model must be selected. In the top left corner of the screen is a drop down menu called ëheaterí, and on the right, Eberspracher Edith ESPAR (PCB, ept, etc), hover the mouse pointer over it and click on ëselect heaterí. The next popup screen will have three columns; on the left is the selection for heater type (Airtronic, Hydronic 10/ M, Hydronic 4/5, Pic-Hex) Much of the setup for using the diagnostic software will be the same for all heaters, Schematic, the center shows the model number, the type of tests that are available. Select the heater type that corresponds to the heater that you are working on. Next, what follows is merely an example of what is possible using the popular Airtronic D2 (25 2069) model of heater. Once EDiTH has been opened and the basic setup has been completed
Eberspracher Edith ESPAR
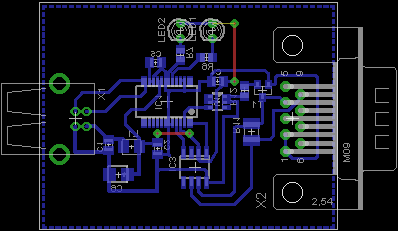
(PCB,Schematic,ept, Pic-Hex) Much of the setup for using the diagnostic software will be the same for all heaters, what follows is merely an example of what is possible using the popular Airtronic D2 (25 2069) model of heater. Once EDiTH has been opened and the basic setup has been completed, a heater model must be selected. In the top left corner of the screen is a drop down menu called ëheaterí, hover the mouse pointer over it and click on ëselect heaterí. The next popup screen will have three columns; on the left is the selection for heater type (Airtronic, Hydronic 4/5, Hydronic 10/ M, etc), the center shows the model number, and on the right, the type of tests that are available. Select the heater type that corresponds to the heater that you are working on. Next, select the model number of the heater (some popular heater types have the option for automatic detection). In our example of the Airtronic D2 model 25 2069) there are three possible tests which may be performed; General data, functional test or switch on component. General data General data will give details such as number of hours, error codes and other details about the history of the heaterís operation. Heater is not operated during a general data test. Functional test A functional test is generally the most widely used test. It allows the technician working on the heater to actually run the heater while receiving and reviewing real-time data regarding the operation of the heater. Like the general data test the functional test also allows for the error codes to be both displayed and cleared. After selecting the correct model type, model number and selecting to start the functional test you will receive a pop up similar to the one shown. The first two options allow for control of setpoint either through the device control (Minicontroler, Digicontroler, Thermostat, etc) or through EDiTH via a text input. The ventilate option will just run the heater in vent or circulate mode. Pick one and select ok. There are two main screen that are of concern; the Measured Values screen and the Graphic screen. Any of the sensor values may be viewed on the graphic screen by first clicking the checkbox beside the displayed value. The graphics screen allows for data to be viewed in chart form in up to one hour increments. Switch on Component This 3 rd option is useful for testing individual components. Testing of the Blower, Fuel Metering pump and Glowpin may be done using this feature. (Note: heater may not be operated in Heat or Vent mode using this). As with the other tests available Error Memory may be retrieved and cleared at any time using the Switch on Component test. The last two options (Switch vehicle blower and Switch antitheft alarm system) are applicable only if heaterís outputs are connected to vehicleís electrical system and normally do not apply to the North American after sales market. If you have any questions regarding using EDiTH, please contact Espar Technical Services, for further assistance
Be the first to review “Eberspracher Edith ESPAR (PCB,Schematic,ept, Pic-Hex)” Antworten abbrechen


![Doosan DMS-5 v3.0.5 [07.2023] Level 1-10 Self Installation Files Pack + Resources Files v1.0.42.545 + Keygen - unlimited version!](http://www.lionsred.net/wp-content/uploads/2025/04/Doosan-DMS-5-v3.0.5-07.2023-Level-1-10-Self-Installation-Files-Pack-Resources-Files-v1.0.42.545-Keygen-unlimited-version-600x450.png)


Reviews
There are no reviews yet.